Installation et câblage d’un contrôleur de puissance à double sortie CP2-4-5
LIRE AVANT L'INSTALLATION
- Installez et/ou utilisez les produits Levven conformément aux codes et règlements électriques locaux.
- Les contrôleurs Levven doivent être montés dans des boîtes de jonction électriques de taille appropriée pour satisfaire au code électrique de votre région. Nous recommandons l'utilisation de boîtes de jonction en plastique pour une performance optimale. Si une boîte métallique est utilisée, assurez-vous que l'antenne du contrôleur dépasse de la boîte de jonction.
- Si vous n'êtes pas certain de toute partie de ces instructions, consultez un électricien qualifié.
Outils et Matériaux
Vous aurez besoin de :
- Tournevis pour accéder à la boîte électrique
- Échelle ou escabeau pour atteindre le luminaire au plafond
- Marrettes (ou capuchons de connexion) pour raccorder les fils
- Testeur de circuit (facultatif)
- Pinces à dénuder (facultatif)
Étapes de câblage
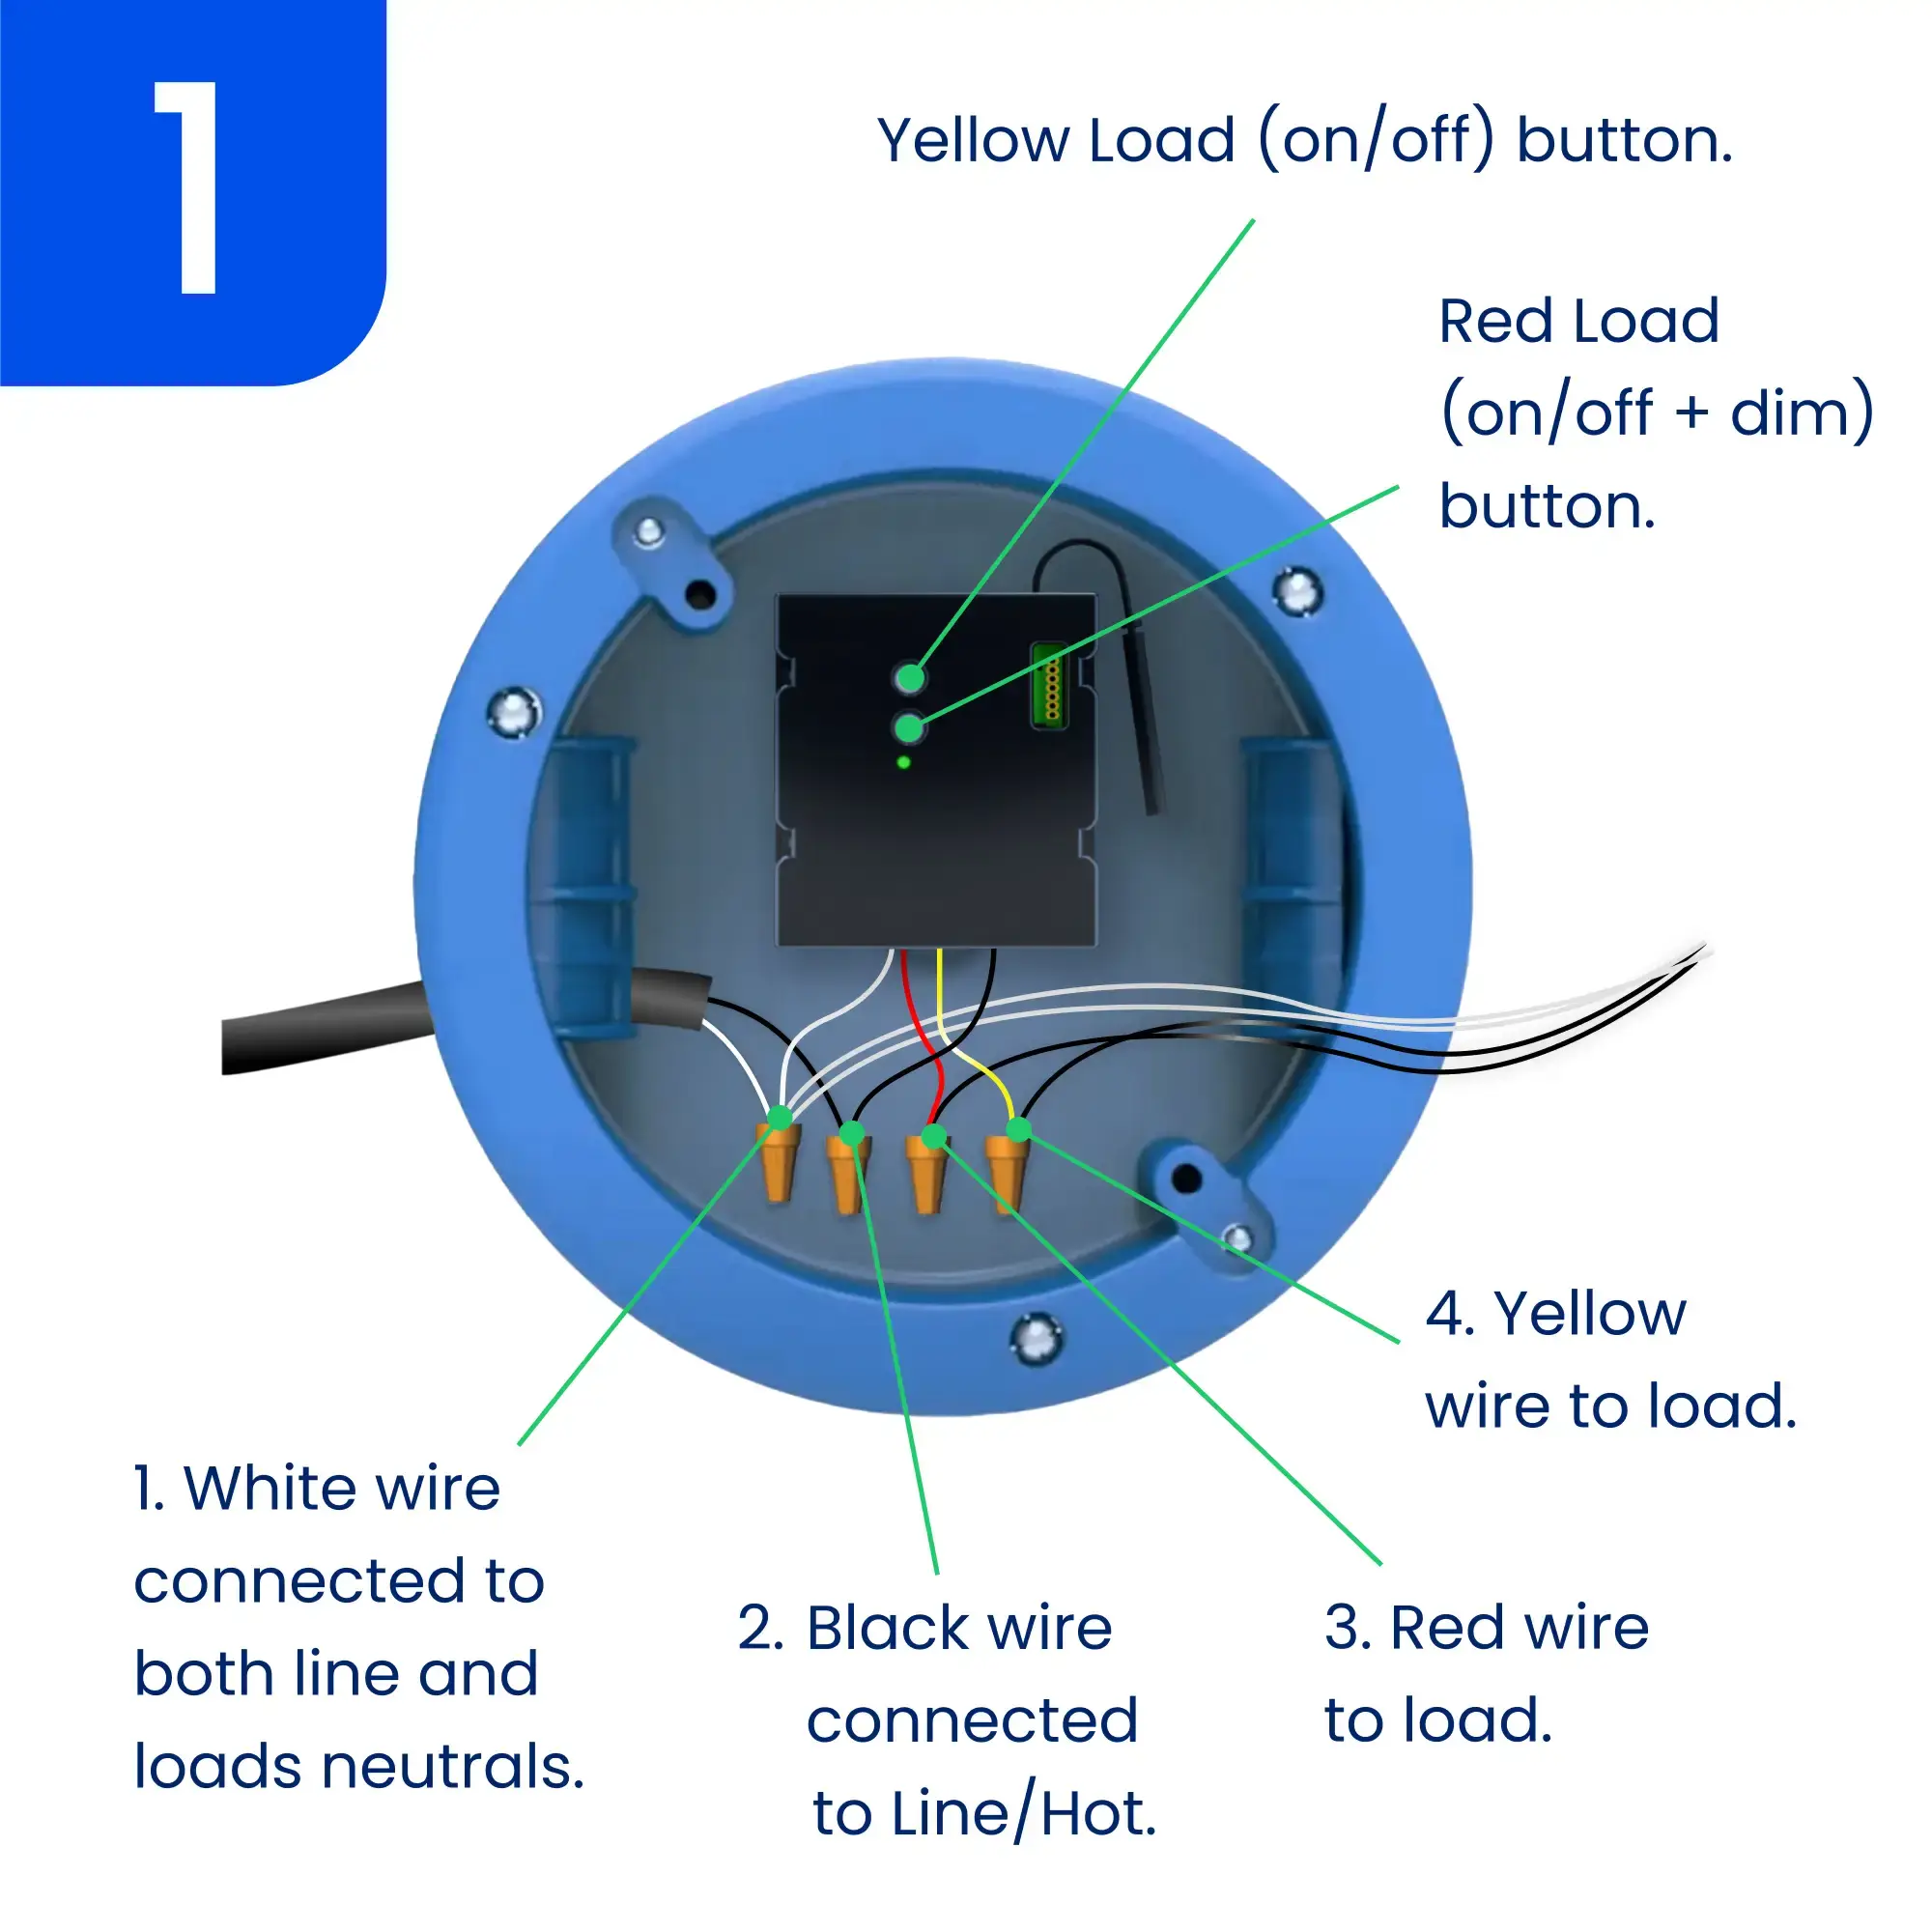
Les contrôleurs doivent être installés dans des boîtes de jonction de taille appropriée afin de respecter le code électrique local.
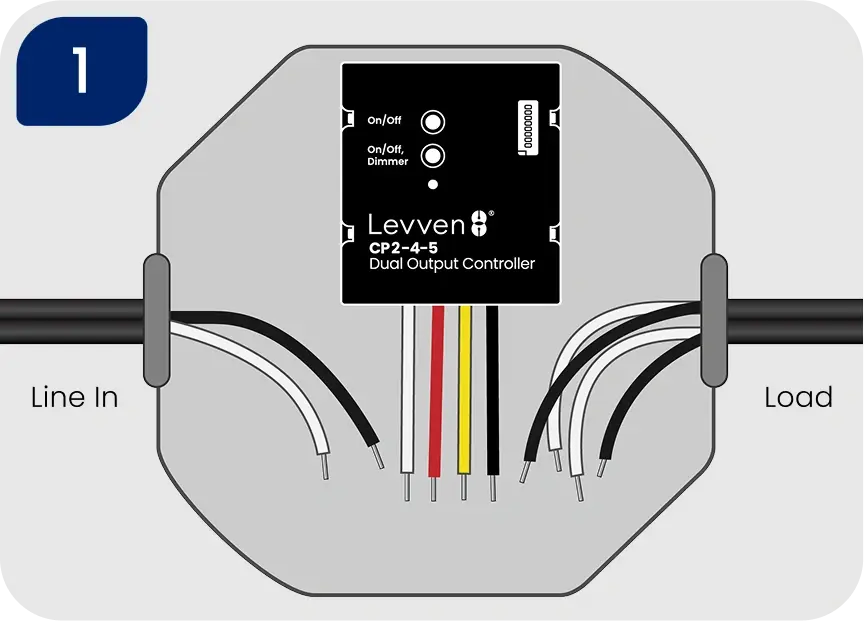
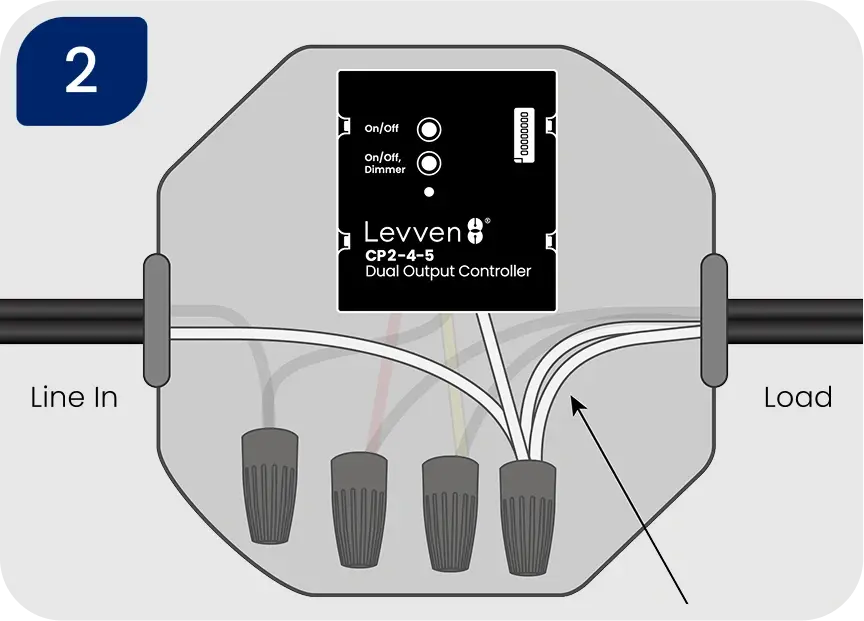
2. Raccordez ensemble les fils blancs de l’alimentation, des charges et du contrôleur
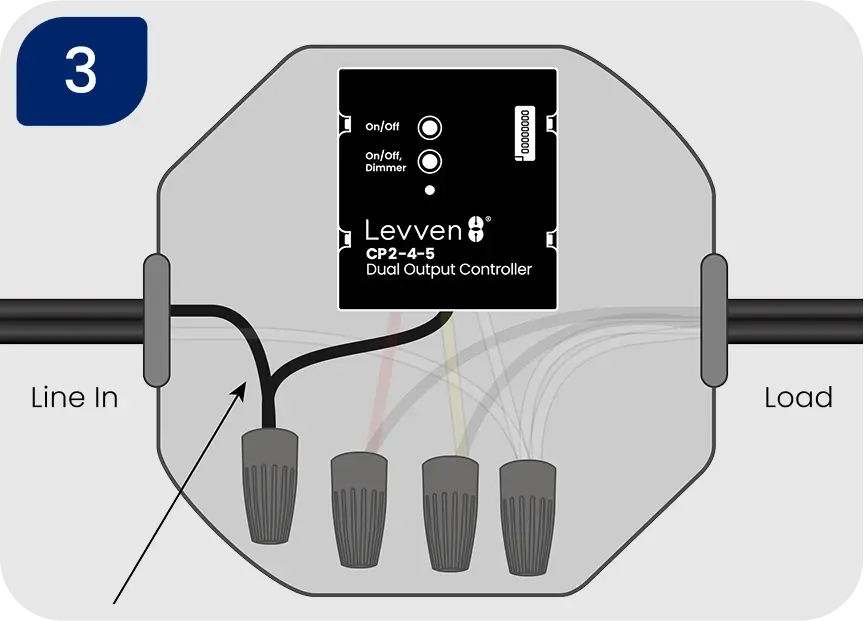
3. Raccordez le fil noir de l’alimentation au fil noir du contrôleur
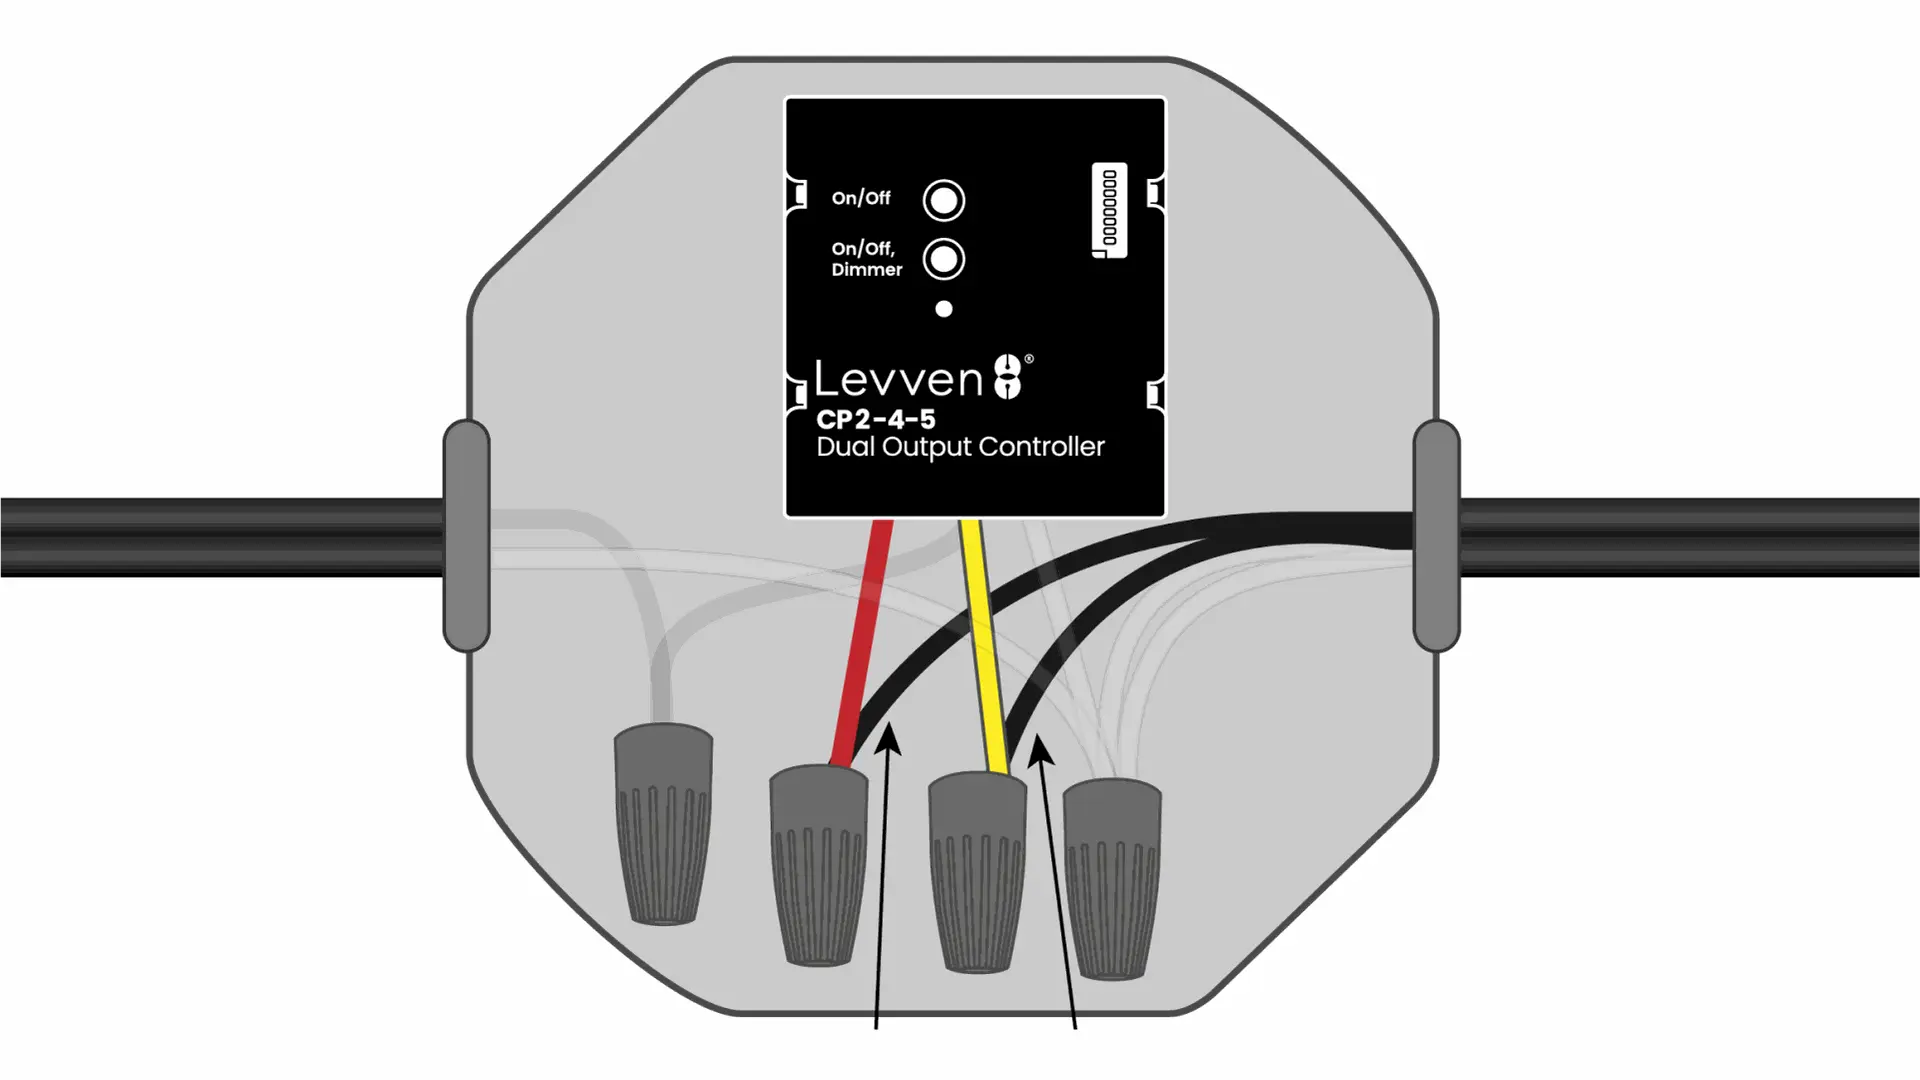
4. Raccordez le fil rouge du contrôleur au fil noir de la charge qui nécessite une fonction de gradation. Raccordez le fil jaune du contrôleur au fil noir de la charge qui nécessite uniquement une commande marche/arrêt.
Une fois les raccordements effectués en toute sécurité, remettez le courant au disjoncteur. La DEL du contrôleur de puissance devrait s’allumer en vert fixe.
Vous avez réussi à câbler le contrôleur Levven CP1-4.
Poursuivez le regroupement de plusieurs contrôleurs, ou couplez des interrupteurs à votre contrôleur
Installation de plus d'un contrôleur
Créer un 'Groupe maison' pour les contrôleurs
Les contrôleurs doivent être dans le même groupe pour fonctionner ensemble.
- Les contrôleurs ne communiqueront qu'avec d'autres appareils dans le même groupe.
- Ils ignorent les signaux provenant d'appareils qui ne font pas partie du même groupe.
Un interrupteur ne peut contrôler que les contrôleurs qui font partie du même groupe.
Lorsque vous ajoutez une passerelle Levven Q à votre maison, elle ne verra et ne contrôlera que les appareils de son groupe.
Comment ajouter un contrôleur à un groupe
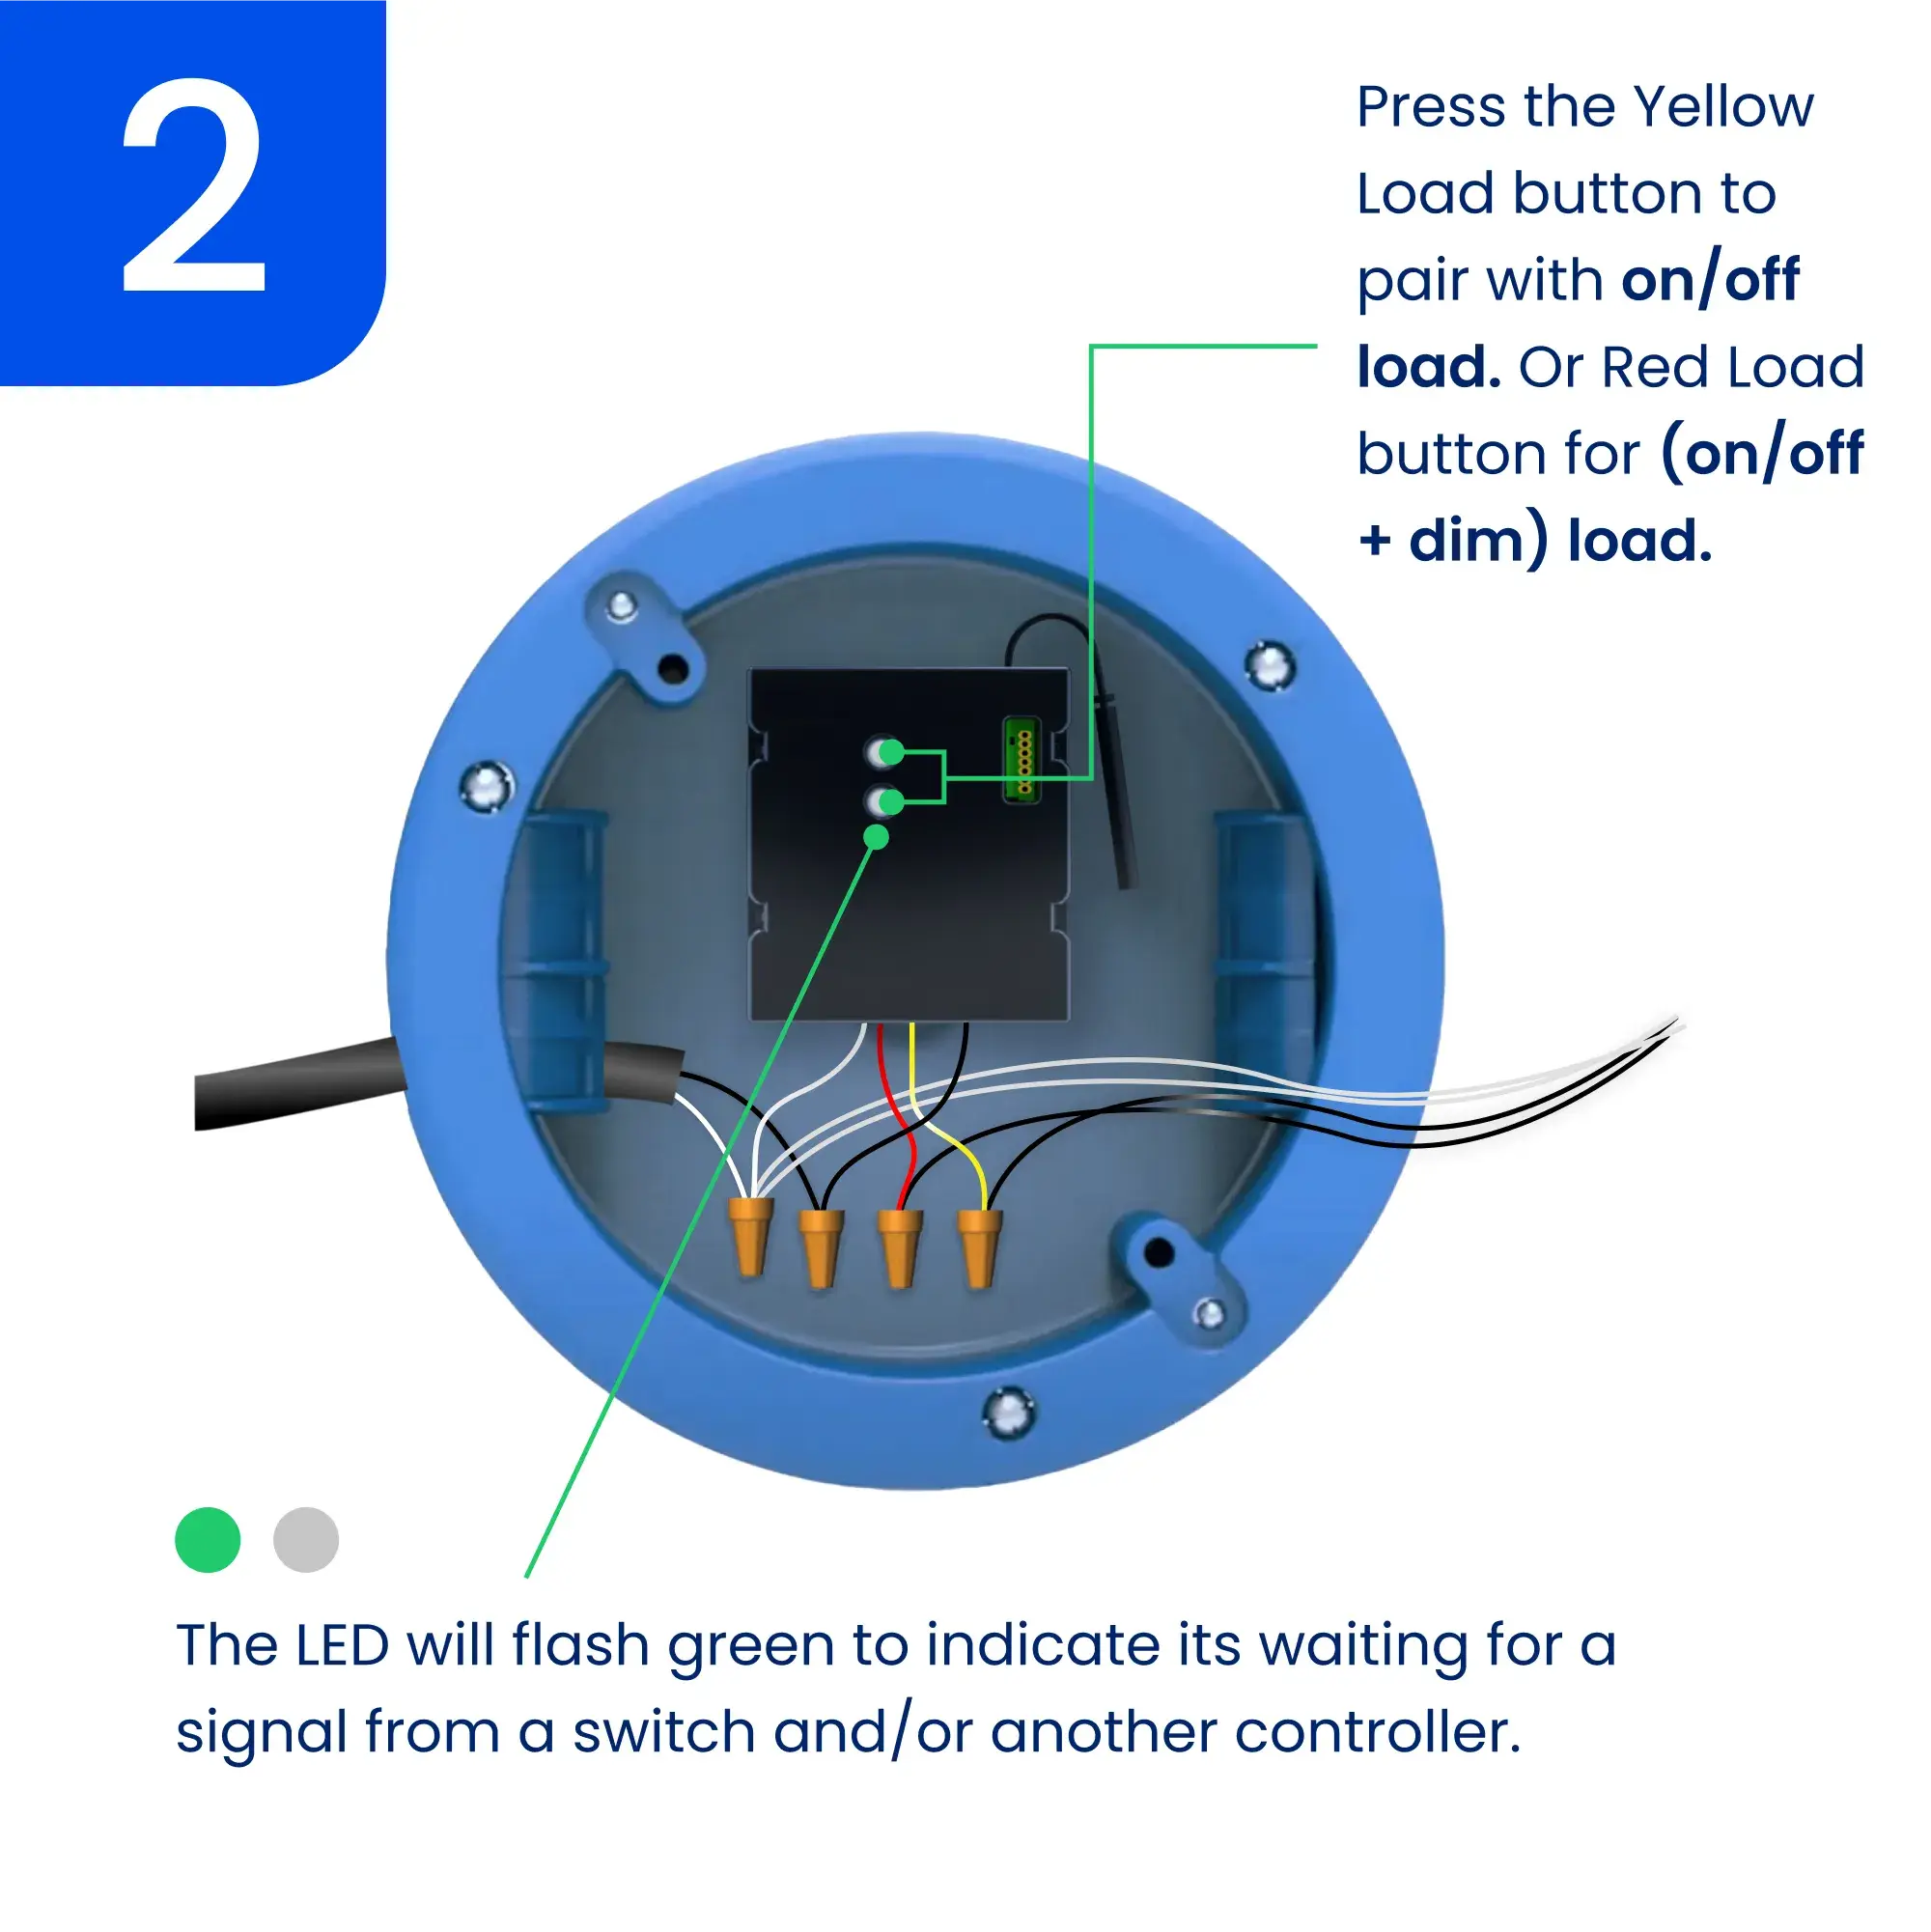
Appuyez puis relâchez l’un des boutons de groupe/jumelage sur le premier contrôleur ou sur tout contrôleur faisant déjà partie d’un groupe. La DEL de ce contrôleur clignotera en vert pour indiquer le mode de jumelage. Pour annuler, appuyez puis relâchez simplement le même bouton de nouveau.
Appuyez puis relâchez l’un des boutons de groupe/jumelage du nouveau contrôleur ajouté au groupe. La DEL du contrôleur clignotera en vert.
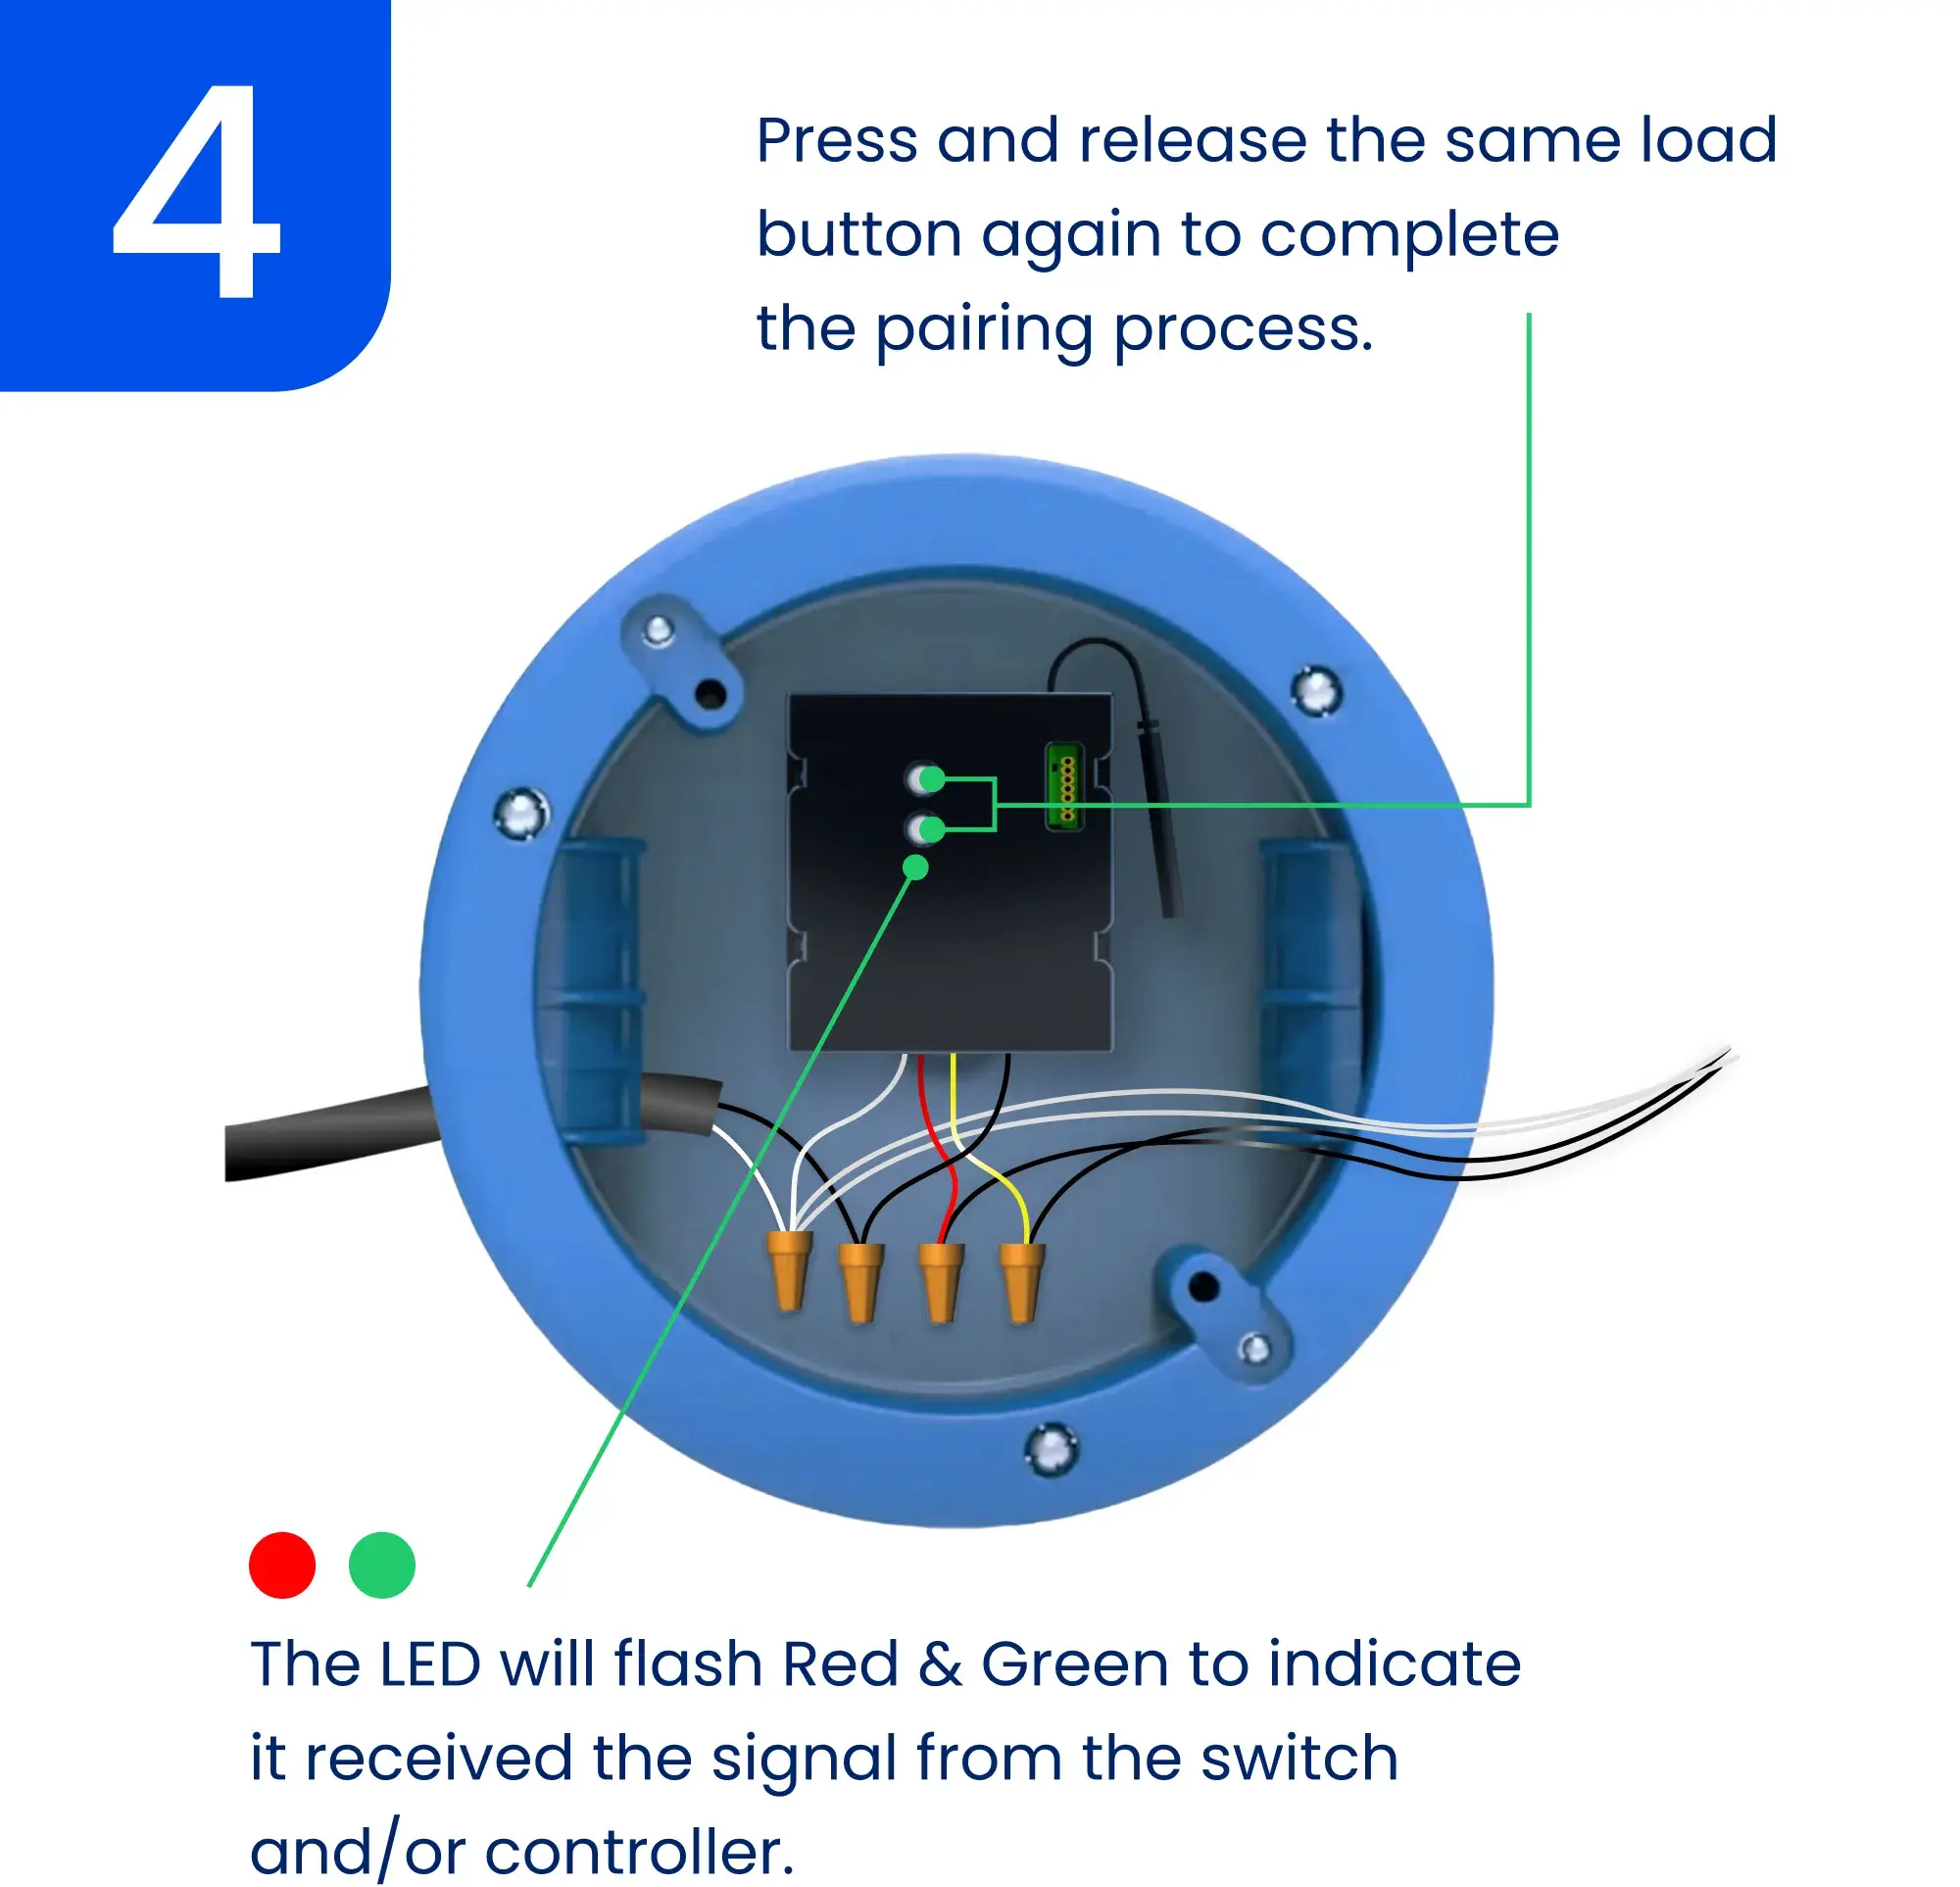
La DEL du premier contrôleur commencera à clignoter en rouge et en vert pour confirmer que le signal a été reçu.
4. Appuyez puis relâchez le même bouton de groupe/jumelage sur le premier contrôleur pour terminer le regroupement. La DEL des deux contrôleurs clignotera en vert trois fois pour confirmer le regroupement. Le processus de regroupement expirera après 60 secondes; il se peut que vous deviez recommencer la procédure.
Répétez ce processus pour ajouter tous les contrôleurs dans le même groupe.
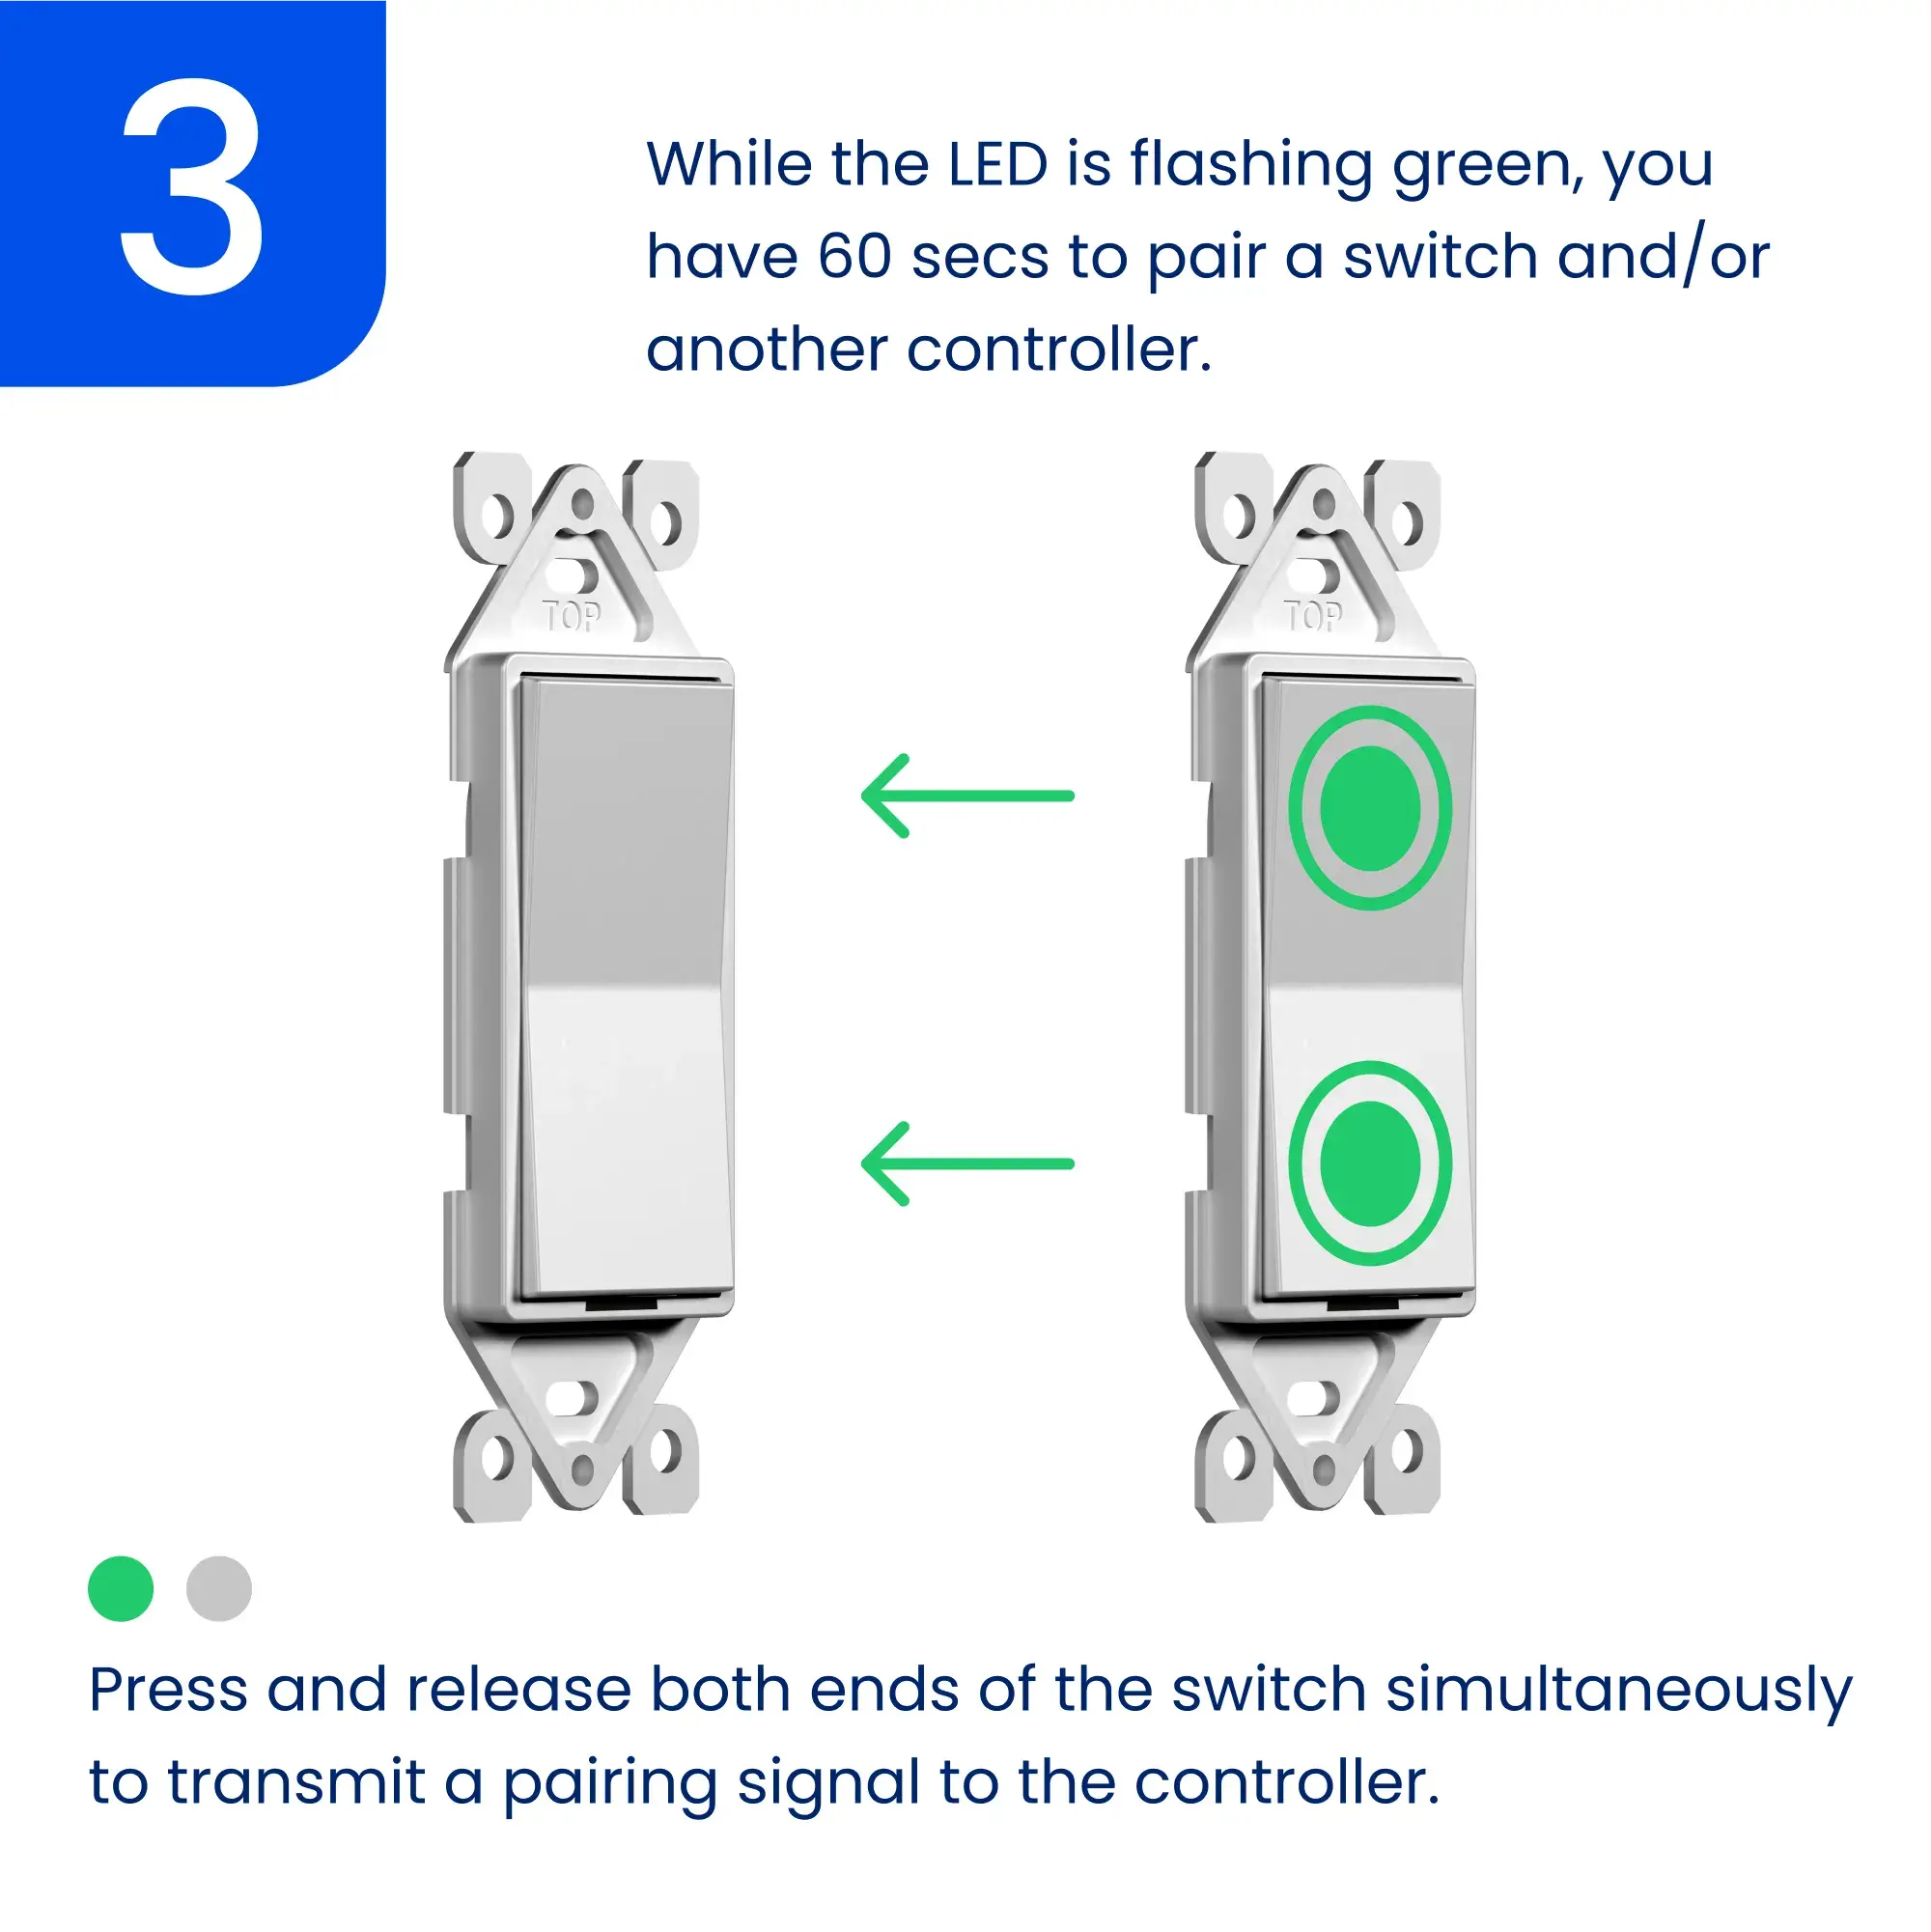
Coupler un interrupteur à un contrôleur
Les interrupteurs envoient des commandes marche/arrêt au contrôleur. Vous pouvez jumeler jusqu’à 10 interrupteurs à chaque sortie du contrôleur CP2-4-5.
Combien d'interrupteurs peuvent être couplés?
Jusqu’à 10 interrupteurs différents peuvent être jumelés à chaque sortie du contrôleur de puissance CP2-4-5.
- Ceci est utile pour les interrupteurs multi-voies (ou va-et-vient).
- Par exemple, vous pouvez avoir un interrupteur en bas de l'escalier et un en haut. Les deux interrupteurs peuvent commander le même éclairage d'escalier en couplant les interrupteurs au même contrôleur.
Coupler manuellement un interrupteur à un contrôleur
Interrupteur gradateur
Pour augmenter la luminosité :
- Appuyez et maintenez le bouton haut/marche enfoncé.
- Relâchez à la luminosité désirée.
Pour diminuer la luminosité :
- Appuyez et maintenez le bouton bas/arrêt enfoncé.
- Relâchez à la luminosité désirée.
Si vous utilisez l'application Levven Controls :
- Diminuez la luminosité en faisant glisser vers la gauche sur la vignette du contrôleur dans l'écran de l'appareil.
- Augmentez la luminosité en faisant glisser vers la droite sur la vignette du contrôleur dans l'écran de l'appareil.
Paramètres avancés
Réglage des niveaux de luminosité min/max
La configuration des niveaux de luminosité minimale et maximale d’un contrôleur Levven permet aux utilisateurs d’adapter la plage de luminosité du contrôleur selon leurs préférences. Cette personnalisation permet d’ajuster finement l’éclairage afin de répondre à des besoins précis et de créer l’ambiance parfaite pour chaque situation. En définissant les niveaux de luminosité minimale et maximale, les utilisateurs bénéficient d’un contrôle précis de leur éclairage, améliorant ainsi le confort et l’efficacité énergétique.
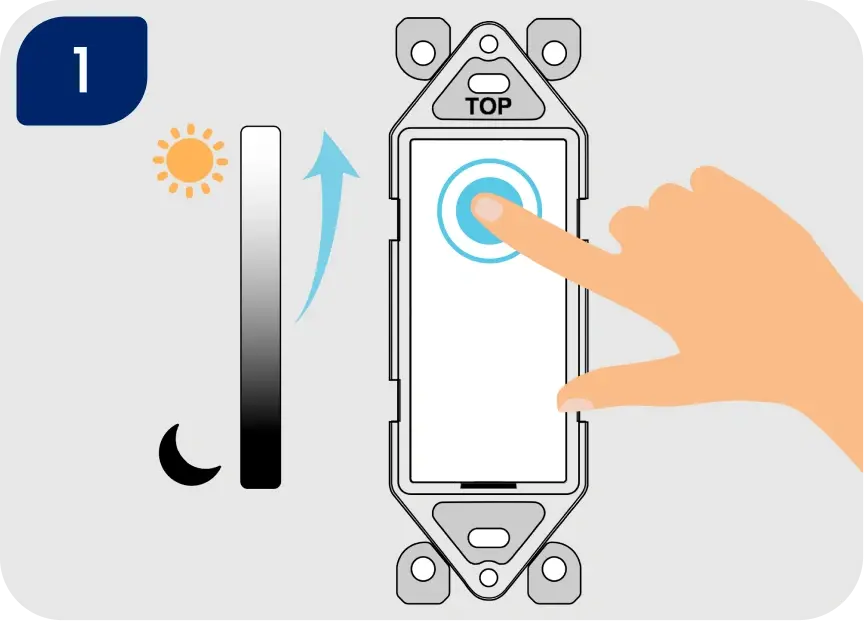
Régler le niveau de luminosité maximal du gradateur
Appuyez et maintenez le bouton haut/marche de l’interrupteur pour augmenter la luminosité de la lumière jusqu’au niveau souhaité.
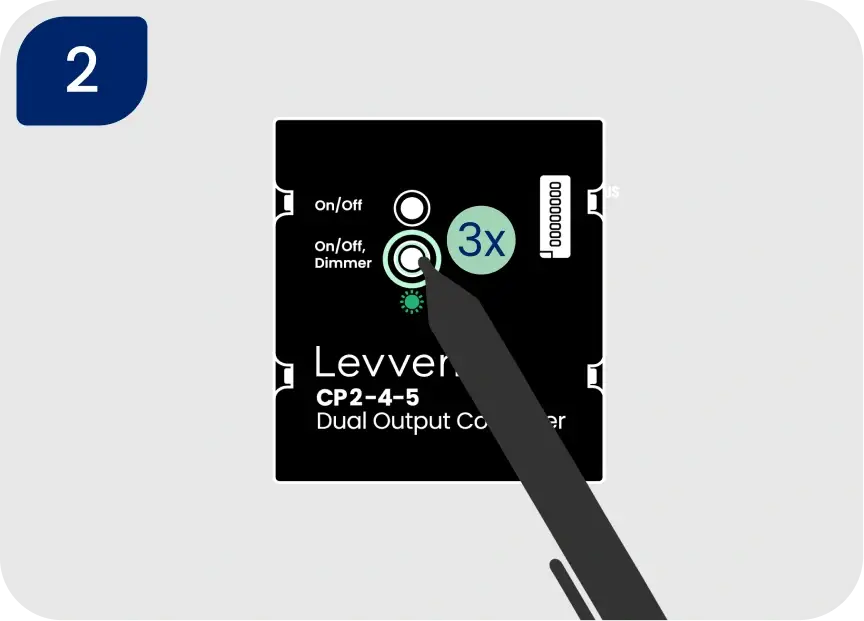
Cliquez trois fois sur le DEUXIÈME / INFÉRIEUR bouton de jumelage du contrôleur. Cela définit le niveau de luminosité maximal. Le voyant DEL du contrôleur clignotera en vert pour confirmer que le réglage est enregistré.
REMARQUE: Si la DEL clignote uniquement en rouge, réinitialisez le contrôleur de puissance aux paramètres d’usine et recommencez la procédure.
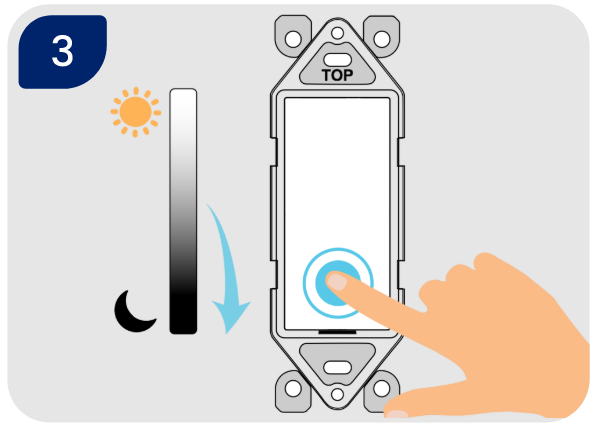
Régler le niveau de luminosité minimal du gradateur
Appuyez et maintenez le bouton bas/arrêt de l’interrupteur pour diminuer la luminosité de la lumière jusqu’au niveau souhaité.
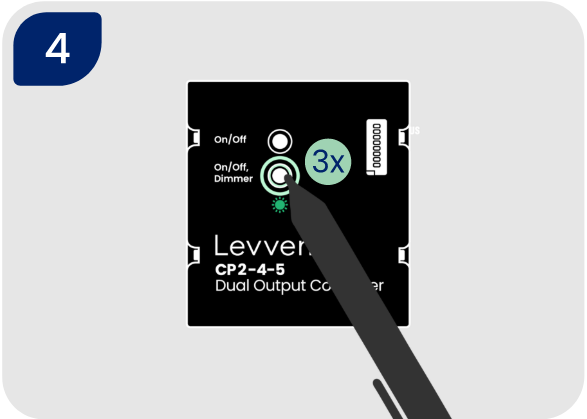
Cliquez trois fois sur le DEUXIÈME / INFÉRIEUR bouton de jumelage du contrôleur. Cela définit le niveau de luminosité minimal. Le voyant DEL du contrôleur clignotera en vert pour confirmer que le réglage est enregistré.
Réinitialisation logicielle du contrôleur CP2-4-5 (paramètres uniquement)
AVERTISSEMENT : Cette opération réinitialisera les réglages du gradateur (niveaux minimal et maximal) ainsi que les interrupteurs jumelés à ce contrôleur.
- Pour réinitialiser les réglages du gradateur et/ou les interrupteurs jumelés du contrôleur, appuyez et maintenez le DEUXIÈME / INFÉRIEUR bouton pendant cinq secondes.
- La DEL du contrôleur clignotera ROUGE trois fois pour confirmer que les interrupteurs jumelés et les fonctions de la sortie ont été effacés.
- Tous les interrupteurs précédemment couplés à ce contrôleur devront être couplés à nouveau: Coupler un interrupteur à un contrôleur
Réinitialisation d’usine du contrôleur de puissance
- Pour réinitialiser le contrôleur aux paramètres d’usine, appuyez et maintenez l’un des boutons de groupe/jumelage pendant 10 secondes. Le contrôleur clignotera en rouge trois fois après 5 secondes pour indiquer que les interrupteurs jumelés et les fonctions ont été effacés.
- Après 10 secondes, la DEL clignotera en rouge 10 fois pour confirmer que le contrôleur a été rétabli aux paramètres d’usine.
Optionnel : Configuration dans l'application Levven Controls
L'ajout d'un nouveau contrôleur est facile avec l'application Levven Controls. Pour utiliser l'application afin d'ajouter des contrôleurs à votre groupe de maison, vous aurez besoin d'une Levven Q Gateway.
Si vous avez besoin de configurer votre Q Gateway, rendez-vous ici pour commencer : Soutien de la Q Gateway
Si votre Q Gateway est configurée et que vous utilisez l'application Levven Controls, rendez-vous ici : Gestion des appareils.