Providing Switched Power to Loads
New homes use Levven power controllers to switch:
- Lights
- Fan motors
- Half- or full-switched plugs/receptacles
One controller can power more than one load, e.g. a series of pot lights all controlled together.
Locations for Controllers
Controllers should:
- Be in a junction box behind the load they control where possible.
- Be accessible using a standard 5-foot ladder.
- Have one controller installed per junction box, unless using an extension ring.
There are several cases where a controller may need to be located in a nearby junction box, including:
- Vanity lights using pan boxes
- Exhaust/ventilation fans
- Ceiling fans (for ease of service)
- Ceiling fan pre-wire
- High ceilings (for ease of service)
- Exterior lighting
Dual-Output Controllers
These controllers have two power outputs. Use them to switch two loads from one controller module.
Dual-output controllers provide cost and installation efficiencies in new construction. One dual-output controller costs less than two single-outputs. Maximize the use of dual-outputs in your installations to gain these cost and efficiency advantages.
Locations for Dual-Output Controllers
1. Two Loads in the Same Box
Example:
Ceiling fan with light (bedroom, living room, kitchen, etc.)
Controller Placement:
Put the dual-output controller in a nearby junction box and use three-conductor wire to provide switched power to each of the two loads. See Figure 1.
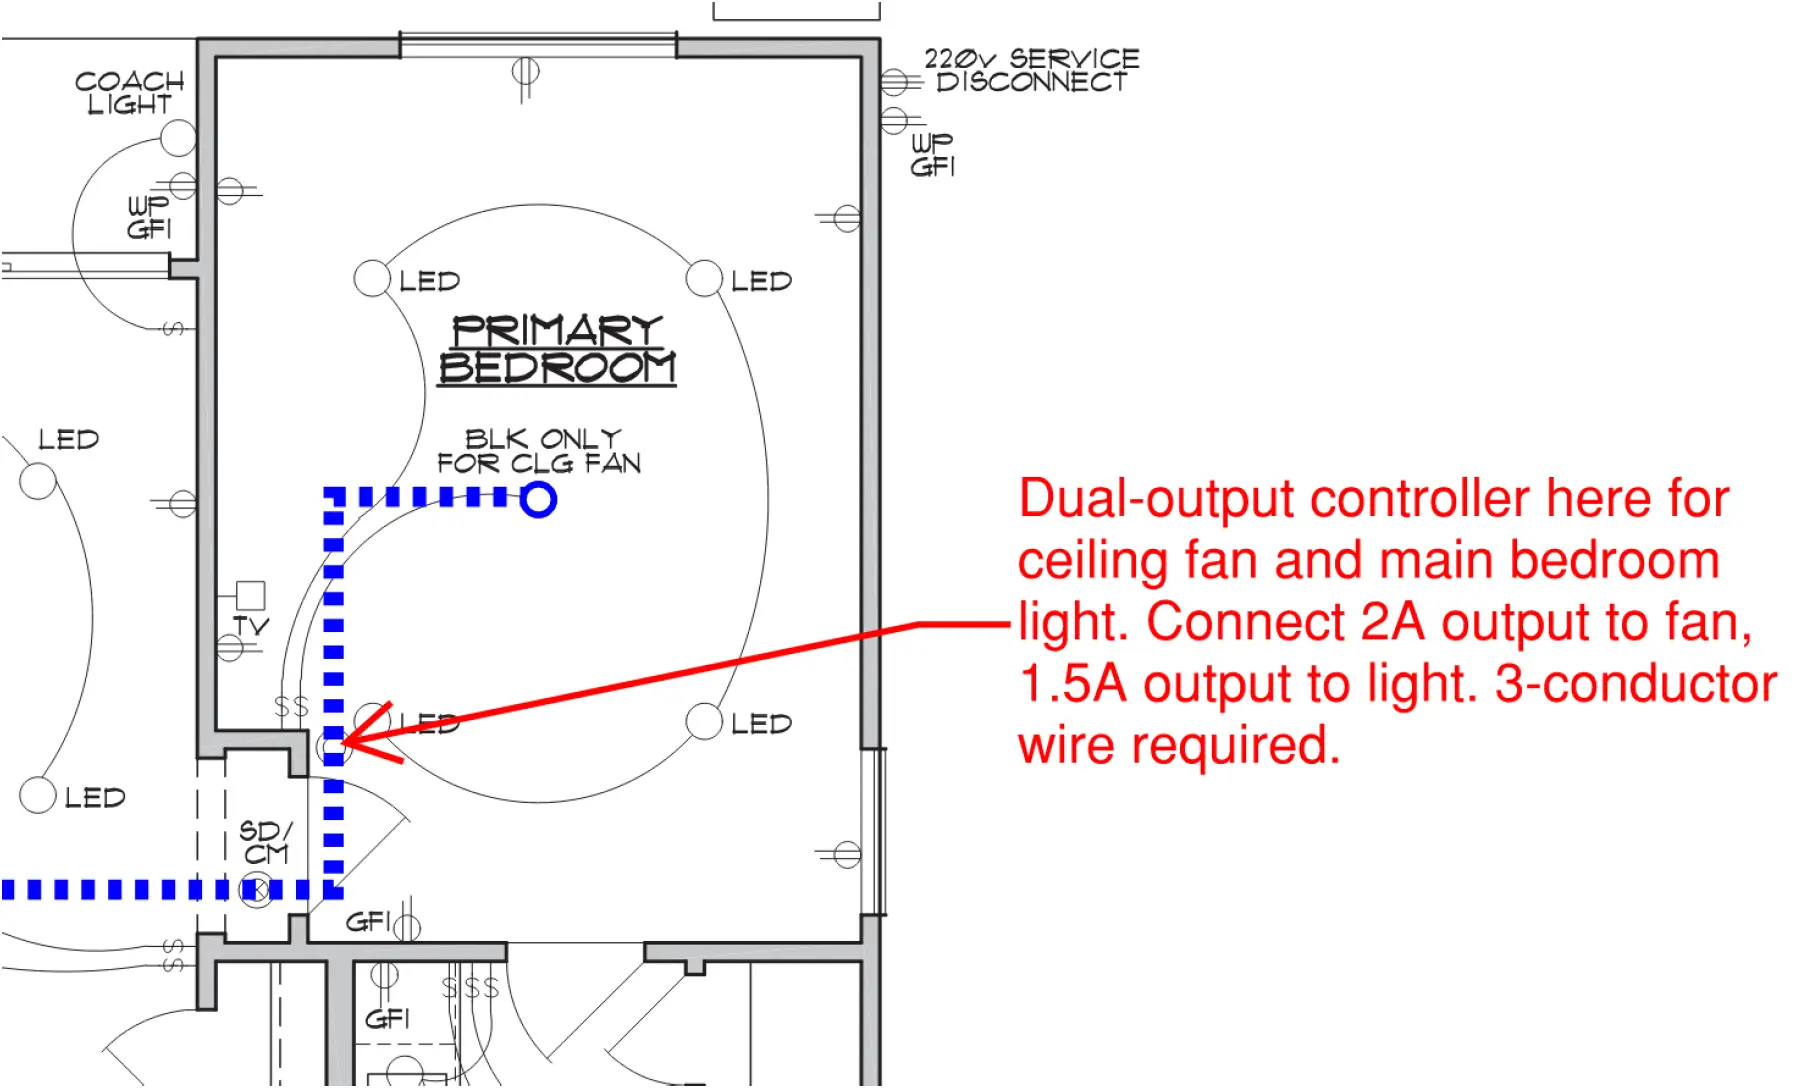
Fig. 1. Dual-output controller providing switched power to a ceiling fan and light fixture.
asd
2. Two Loads in the Same Room
Examples:
Bathroom light and exhaust fan
Laundry room light and exhaust fan
Kitchen pendant lights and recessed lights
Controller Placement:
Put the dual-output controller in the junction box for the first load. The second load will be in its own junction box nearby. Connect the second load with a short run of two-conductor wire. See Figure 2.
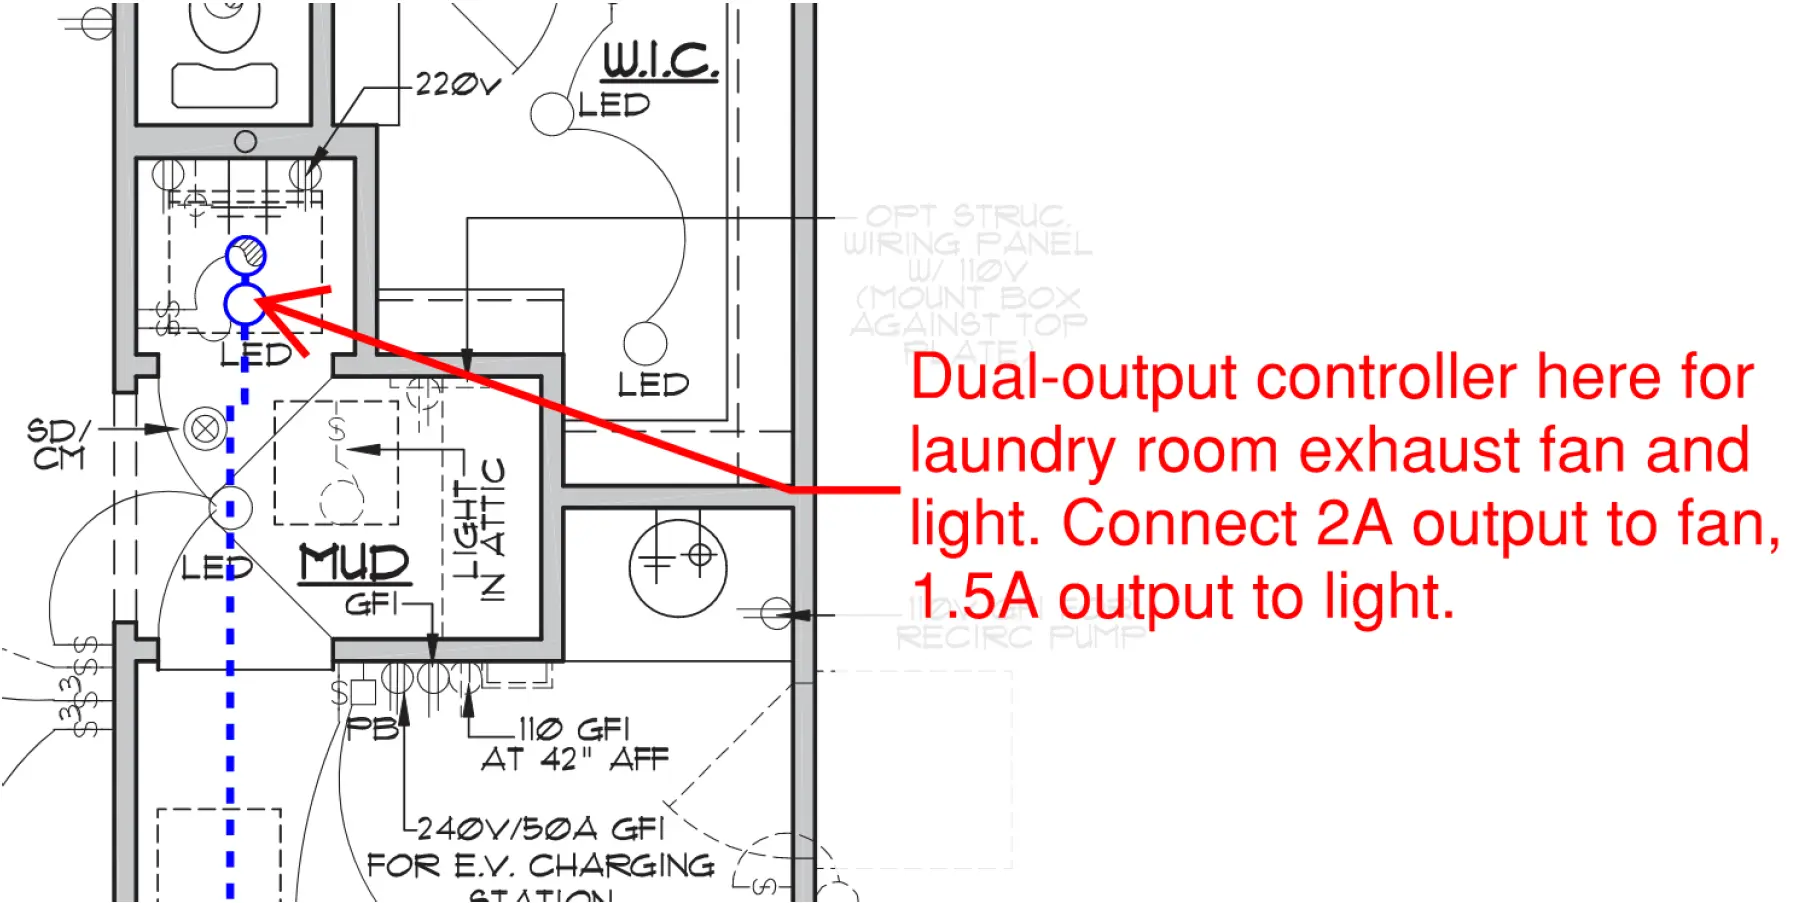
Fig 2. Dual-output controller providing switched power for two different loads in the same room.
3. Two Loads Relatively Close to Each Other
Examples:
Foyer light and exterior front door light
Garage light and exterior coach light
Bedroom light and walk-in closet light
Stairwell light and upstairs hallway light
Controller Placement:
Put the dual-output controller in the first junction box. Connect one of the controller’s outputs to the first load. Run wire to the next box and connect the remaining output to that load. See Figure 3.
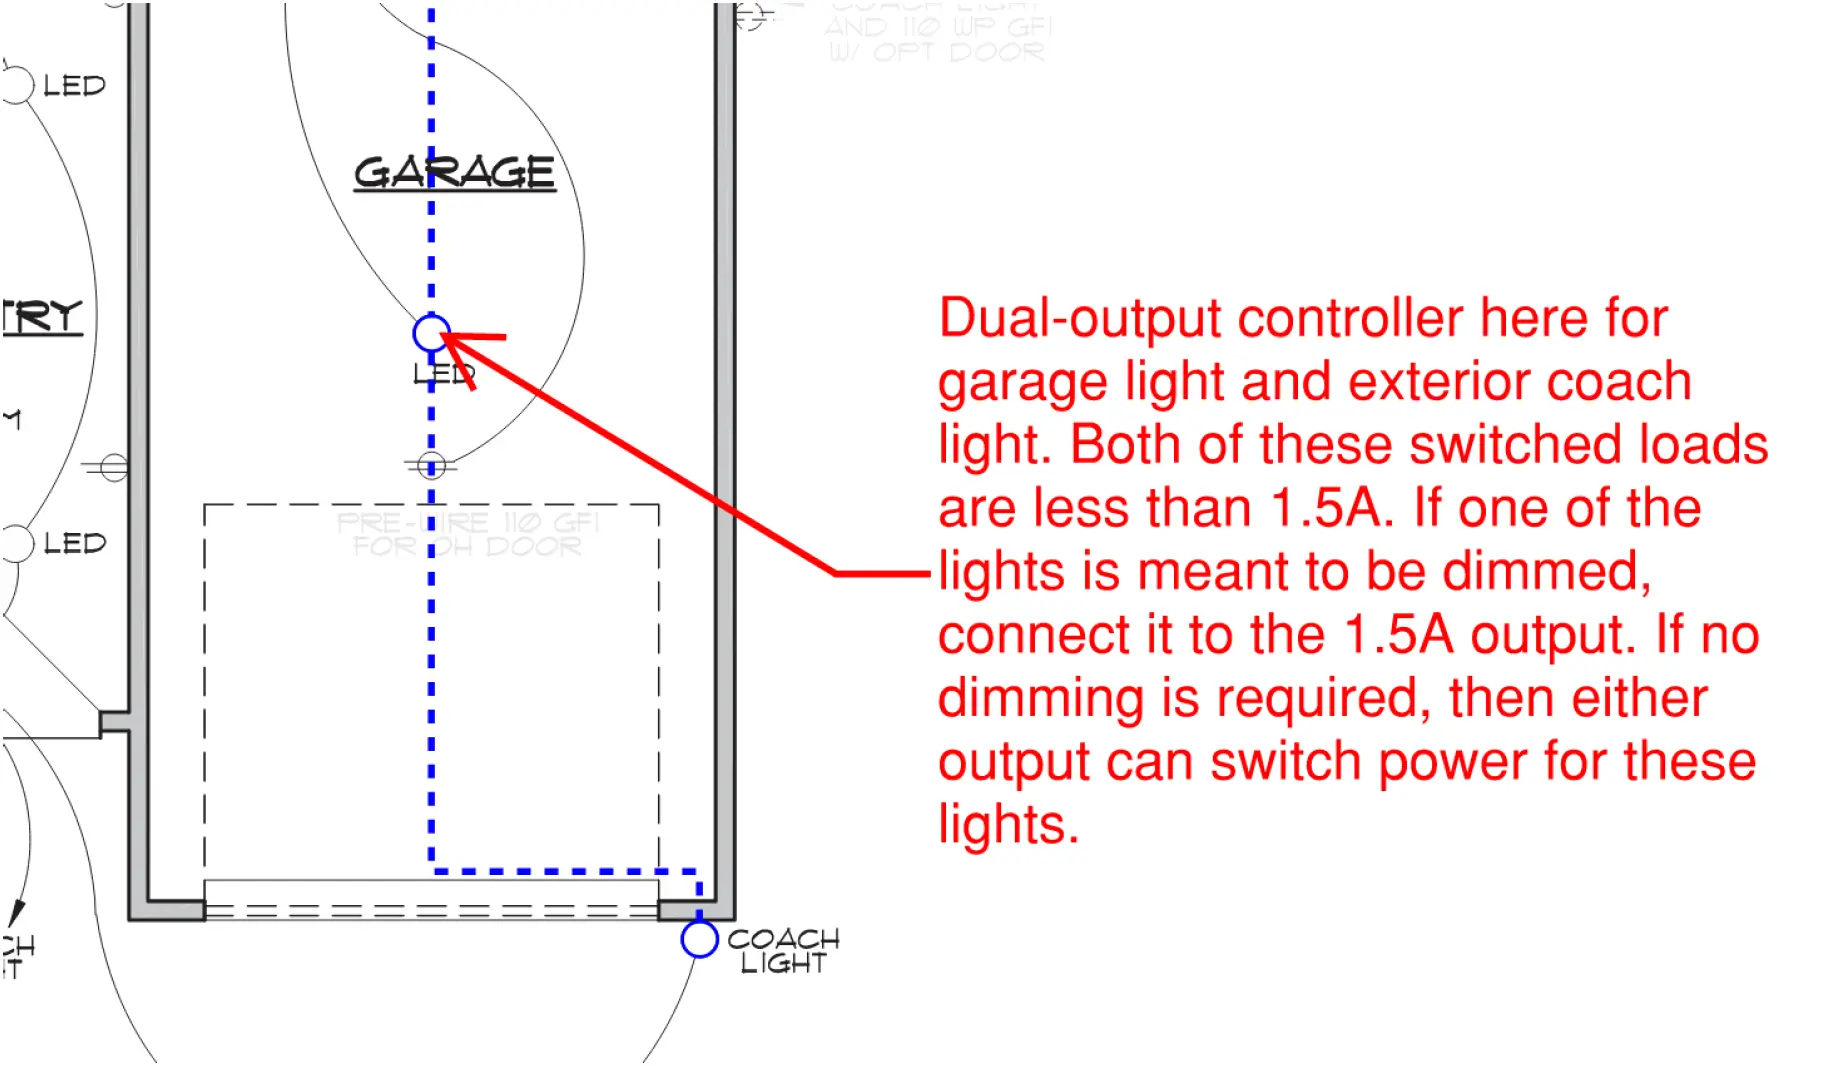
Fig 3. Dual-output controller providing switched power to two loads in nearby locations.
Single-Output Controllers
Levven single-output controllers can switch one load. Use these in locations where a dual-output controller is not feasible.
- CP1-4 | 1.5A single-output on/off power controller (specification sheet) (user manual)
- CP1-4D | 1.5A single-output dimmer power controller (specification sheet) (user manual)
- GPC20 | 20A single-output on/off power controller for high-power loads (specification sheet) (user manual)
- GPC10 | 10A single-output on/off power controller (discontinued as of Q1 2026)
- GPDT15 | 1.5A single-output dimmer power controller (discontinued as of Q2 2026)
Controller for Blue Pairing Plate
The "Blue Pairing Plate" is a controller installed in a single-gang wall box. If the homeowner or a future service technician needs to group or pair a new Levven device, they can press the group/pairing button on this Blue Pairing Plate controller.
This controller is purposefully installed in the wall to give the homeowner access to a controller without having to remove a light fixture from the ceiling.
The Blue Pairing Plate is typically located near the electrical panel, and is used to provide switched power to the light in that room.
See Installing the Blue Pairing Plate for more details.
Constant Power for Controllers and Smoke Detectors
Provide constant power to controllers and smoke detectors.
Avoid connecting a controller to switched power! Use 3-conductor where necessary to bring constant hot from a previous box to each controller or smoke detector.
Beware of Motor Loads
The CP2-4-5 controller has a 0.8A motor rating, which will power the majority of residential ceiling fans and exhaust fans.
If you have a larger motor load, specify the GPC10 controller (rated for motor loads up to 1/6HP at 120V).